Getting started with Bare Conductive TouchBoard
Bare Conductive built a board especially designed for capacitive touch. It connects your Arduino to regular objects around you. Anything that conducts electricity will work: spoons, plants, furniture... anything! They also offer a conductive paint so you can make a drawing or painting come to life and interact with the Arduino.
Unboxing
This was by far the most polished experience I've ever had with an Arduino kit. The instructions say to plug in some headphones and power the board via the on-board micro-USB. Once you're hooked up and powered, you just touch one of the large pads with your finger and it plays one of the pre-recorded files that came with the pre-installed microSD card.
Starting with E0 all the way up through E11 gives you a brief yet dense intro to the inner workings of the TouchBoard. Absolutely fantastic way to demo how the board works!
Uploading and processing MP3s
After the enlightening hookup experience, I was eager to drop my own files into the microSD and give it a shot. After my first try I noticed that the board was much slower to respond to my taps than it had been with the tutorial audio.
Upon inspecting my files I noticed a lot of baggage was present: ID3 and other metadata, including cover art images. A quick scrub using LAME was all I needed to get the board playing instantly again:
# install LAME with homebrew
brew install lame

# do this for each file
lame --decode TRACK000.mp3 TRACK000.wav
mv TRACK000.mp3 TRACK000_orig.mp3
lame TRACK000.wav
rm TRACK000.wav
Using the default quality settings (44.1KHz, 128kbps) produced files that sound good on any basic speaker. I'm sure bigger sound systems could expose the lack of quality if you compress too much, but to keep the system responsive you'll want to have smaller audio files.
Other features
The TouchBoard is based on the Arduino Leonardo, featuring all the pins in their standard positions for easy integration with shields. In addition to the standard pins, the board has an additional twelve electrodes for your touch project. The number twelve happens to correspond to the twelve notes available in the chromatic scale, making contemporary music easy to produce.
The board is capable of MIDI, but requires a hardware modification by connecting two terminals on the board. For a temporary connection they recommend dabbing the conductive paint. The paint can be easily removed later on using a qtip soaked with water.
I had a look through the MIDI demos and they have very polished, clearly documented code examples. If you have a little bit of experience reading Arduino code, it's easy to get started.
Now, to paint something!
While it was fun to try the board out, the real magic happens when it's connected to the real world somehow. My first painting was quick, just so I could try the board out:
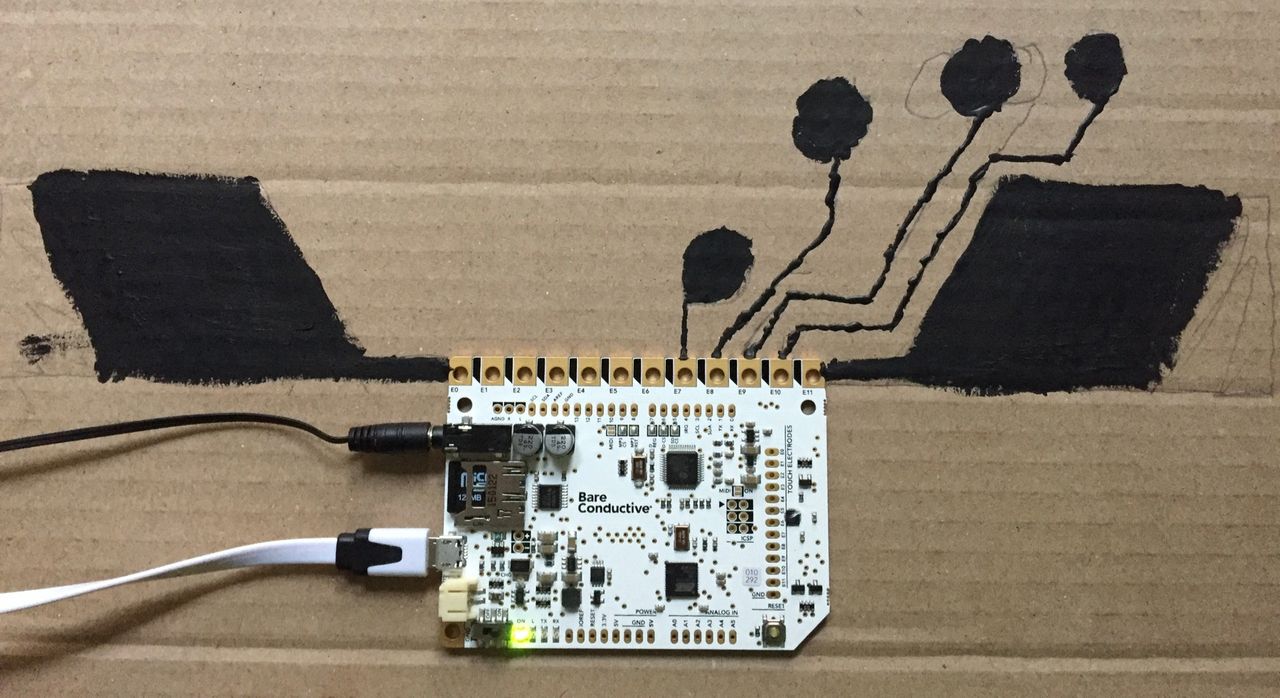
It worked on the first try. I just made sure none of the lines of paint touched, and had good connections to each electrode. The board advises you to use the RESET button often when adding or changing the paint, as it triggers the calibration step on the board. In my experience the reset process is error-proof.
Their website contains many tutorials for painting, covering all aspects of the process: from stenciling techniques, to waterproofing, and even tutorials on making various kinds of sensors (e.g. direct touch vs proximity). I'd highly recommend reading through a few pages and playing with the materials provided in the pro kit.
All in all it is a wonderful arduino kit that lets you begin making things immediately. Bravo to this team! I am eagerly awaiting their next kit which focuses on touch-sensitive lights instead of audio.