LilyPad Arduino LED Purse
This was my first dive into Arduino. My goal: to make something unique for my little sister Zoe as a gift. I decided on a LED heart embroidered into a purse.
Find the right purse
First things first, you have to have an object which provides a good foundation for sewing. Something with thin or stretchy material should be avoided, especially for a first-timer like myself.
I couldn't dissect it without buying it first, but I found one with a firm inner layer that felt fit to support the LilyPad plus a battery. It turned out to be perfect. I found a sturdy, sewing-friendly grid pattern once I cut open the outer fabric of the purse:

Really though, if you attempt a project using the wrong garment, it will make things hard to build or impractical to wear once the project is complete. Take care to select a good base for your project!
Design and plan
Before you begin sewing, it's important to plan and sketch out the whole project ahead of time. You must be sure that you can accomplish your goal without crossing wires. Use the actual object. Take some chalk and sketch lines for each thread you will sew until the whole thing is laid out.
My planning phase was crucial. My original goals were lofty and the sketching phase brought me to a more practical design that I could easily accomplish. First, I'd imagined a flower with petals, using green, white, and yellow LEDs. But no matter how I tried, the layout and density of LEDs was too complex for a beginner like me to sew. I decided a heart was a simpler goal.
After I'd settled on a simple heart shape, I imagined making each LED of the heart be individually addressable, but once again quickly realized it wasn't practical. The amount of sewing I'd have needed would have been too complicated for me. So I settled on a much simpler circuit layout with two halves. Each half would be sewn to a LilyPad terminal, meaning the two halves could blink independently. It was a nice shape with far less sewing involved, just two lines plus ground.
Sewing your circuits
The main difference between the LilyPad and other Arduino boards is that it's specifically for textile projects. Instead of breadboard-style pins, there are wide terminals with big holes that are easy to sew. Instead of wires, the conductive thread connects everything together. The thread is also what secures everything in place, so if you're not handy with thread and needle, give it a try with some normal fabric and thread first.
I would highly recommend gluing your LEDs to the fabric before sewing. I did not do that with this purse, and I know it slowed me down big time. Part of the reason was that I wanted the LEDs to be in a very specific pattern, and their orientation was also important. A dab of glue to hold them in place would have saved me a lot of effort getting them into position.
Subsequent projects were far easier to execute by gluing first, then sewing the terminals afterward. Fabric glue works, but I have found superglue to be the best. It also works fast, so you don't have to wait more than a couple minutes before continuing.
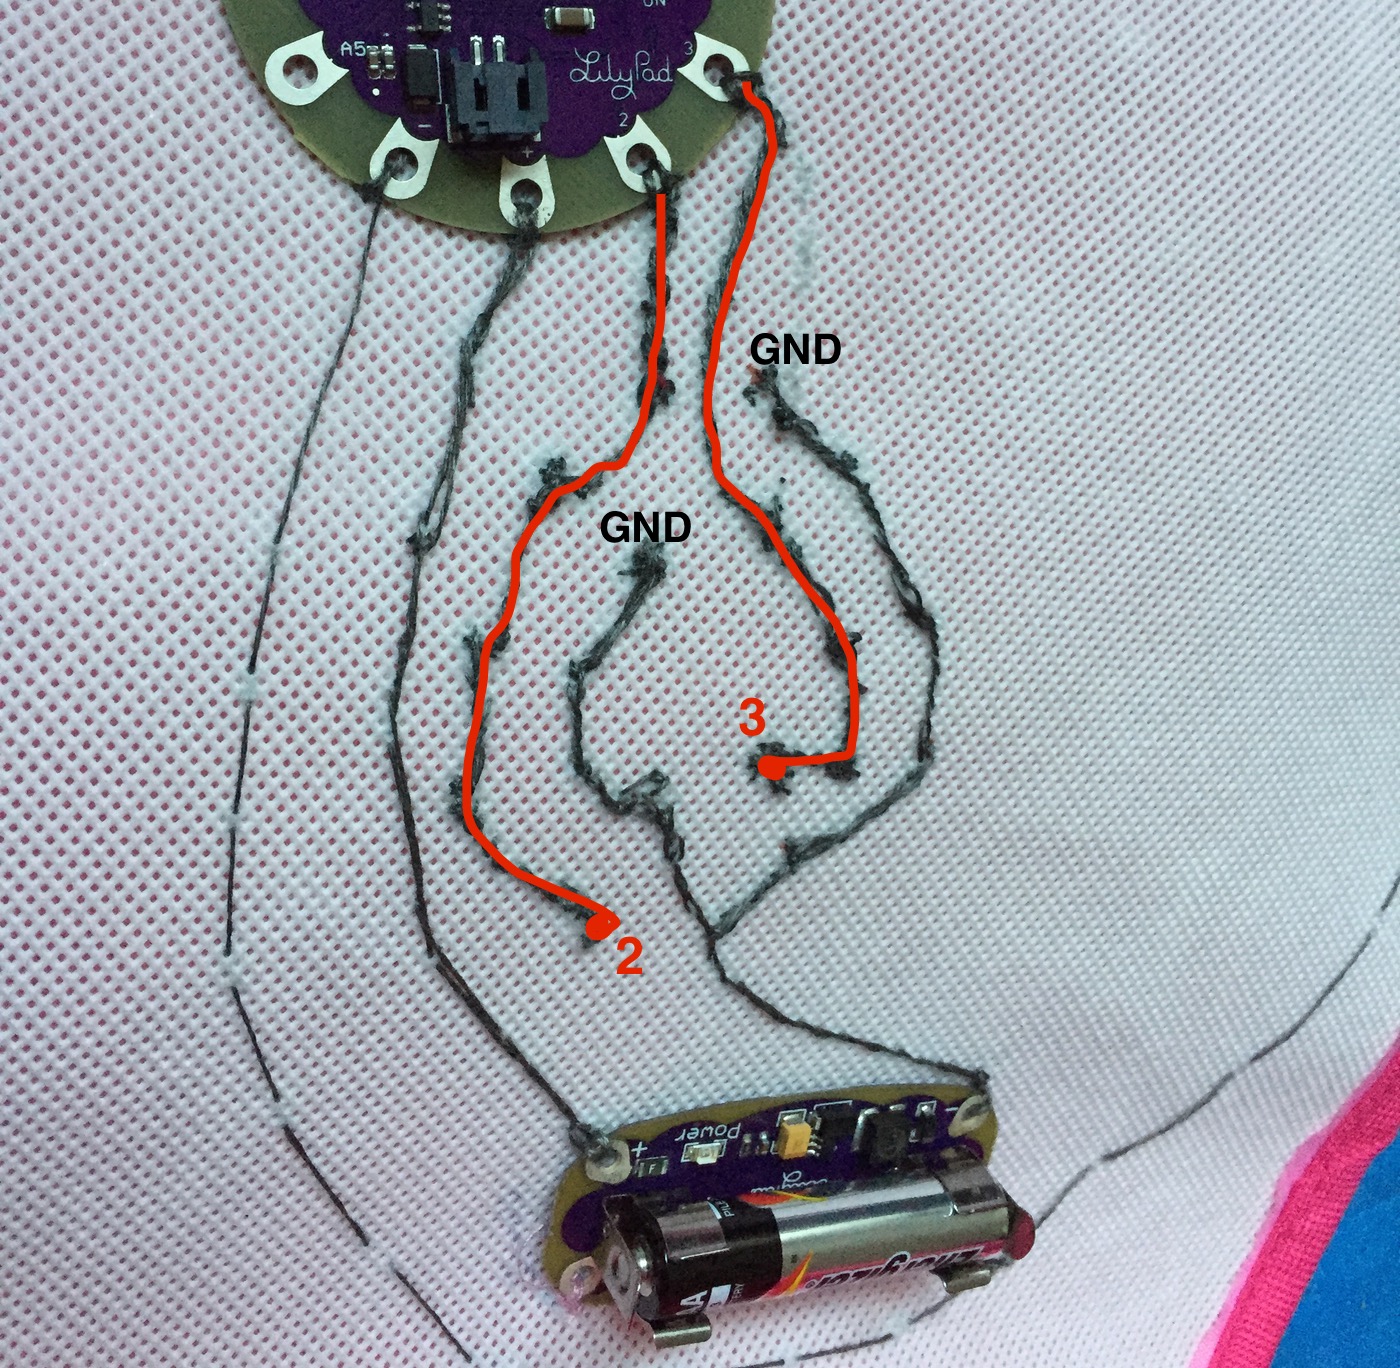
Remember to follow your sketch. Do not deviate! You can see my photo where I did not sketch first and relied on a hand-drawing I had for reference. The thread coming from terminal 3 ended up crossing GND and I shorted the LEDs until I pulled all the thread out and started over.
Programming your circuits
My modest program for the purse fits on a sheet of paper. It turns the two lines of LEDs on and off in a staggered pattern. Each of the four possibilities is enabled for a quarter of the cycle, which is 500ms for a 2000ms cycle as coded below.
/*
 * LilyPad LED Purse
 */

const int left = 2;
const int right = 3;

// Number of LED circuits
const int N = 2;

// Total amount of time for one cycle
const int delayTime = 2000;

// Set things up
void setup() {
  pinMode(right, OUTPUT);
  pinMode(left, OUTPUT);
}

// Main program. Runs over and over again without stopping.
void loop() {
  // Turn LEDs on
  digitalWrite(right, HIGH);
  delay(delayTime/N/N);
  digitalWrite(left, HIGH);

  // Leave lights on for a bit
  delay(delayTime/N/2);

  // Turn LEDs off
  digitalWrite(right, LOW);
  delay(delayTime/N/N);
  digitalWrite(left, LOW);

  // Leave lights off for a bit
  delay(delayTime/N/2);
}
Uploading the program to the LilyPad sets up an endless cycle which looks something like this:

The fun part is that each time I visit her, I can reprogram the Arduino to do something different! I could even stitch new sensors on or add a button. There are plenty of terminals left on the Arduino. Code-wise, I could add pulse width modulation so the LEDs fade on and off instead of just blinking.
Improvements for next time
This was a modest but productive first project. I learned all the basics and overcame many pitfalls, but in the end had something my sister loved! If I had to do it all over again, I would do it quite differently. But that's to be expected for your first try.
For starters, I would sketch on the purse itself and avoid any resewing. I'd also use a smaller battery. The number of LEDs means I could have used a smaller coin battery (e.g. CR2032) which is flatter and lighter. Even for an amateur, miniaturization is an unavoidable aspiration once you get into the nuts and bolts of this stuff!
Finally, I did not insulate any of the threads, meaning they can short if the purse is bent too far. Easily fixable with some fabric glue. I'd highly recommend insulating all circuits you embed into textiles. They're much more flexible than your average PCB and for something like a shirt your body also acts as a conductor. Protect your creation and yourself!